Resto & Custom
Mazda 323 Protege (BG)
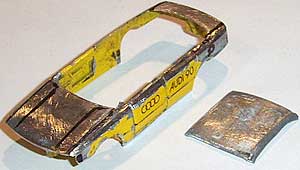
For a long time I have been searching for a model car of a 1991 Mazda Protege in any scale. I have found out that this car has never been made in any scale and so I decided to create a car of my own. My preferred scale was 1/64. I was looking for a 1/64 car that would look most similar to my desired car, but felt sorry for buying a new model to immediately take it apart. This Audi 90 was my rescue. I had three examples, all in C2 - C5 condition, The most wrecked one was not intended to become anything special, until I got the idea...
First off, this was a tough, but very amusing piece of work. I had my problems with positioning the roof appropriately or spray painting the car, but in the whole story got a Hollywood-like happy ending.
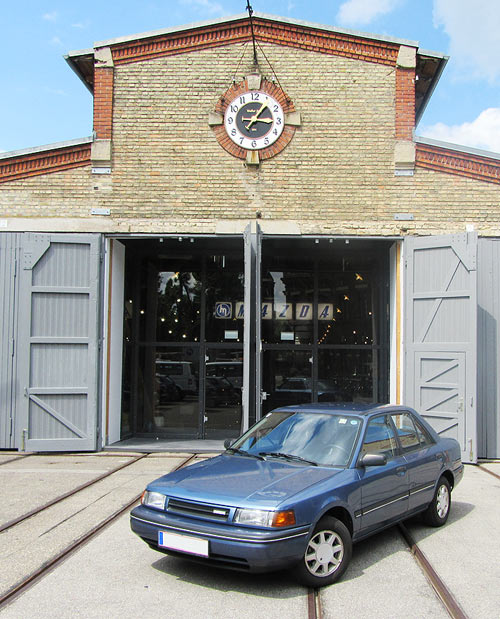
To the right you can see my real car, which was donated to the collection of Mazda Classic Automobil Museum Frey in Augsburg, Germany. This picture has been shot on the day I drove it 400 Kilometers to the Museum. This little car took the trip with ease.
First off, this was a tough, but very amusing piece of work. I had my problems with positioning the roof appropriately or spray painting the car, but in the whole story got a Hollywood-like happy ending.
To the right you can see my real car, which was donated to the collection of Mazda Classic Automobil Museum Frey in Augsburg, Germany. This picture has been shot on the day I drove it 400 Kilometers to the Museum. This little car took the trip with ease.
I made the following steps to create the first replica of a 1990-94 1st generation Mazda Protege:
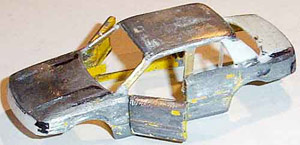
As I had two rather wrecked Audi 90 by Majorette, I decided to restore one of them and to take some parts from the other one. I decided to take the windows which were in a better condition than the other ones from the other Audi.
I cut off the roof and the pillars, but kept the roof itself for its purpose as the new Protege roof. i turned the roof direction the other way round to create a window frame shape which exists in the Mazda Protege.
Shaping the body. After the rear of the car was finished by using UHU Repair All, i went on to putting a roof. After that I added some repair All around the pillars, which were formed out of a mustard tube aluminium. It helped me creating pillars just the way I wanted. The front grille was also made with the Putty.
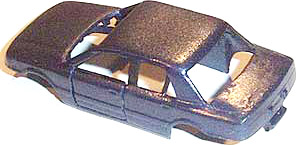
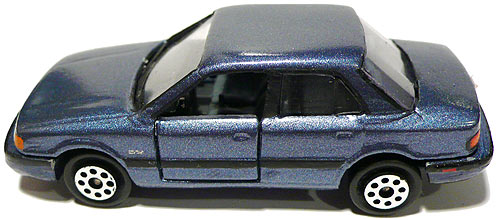
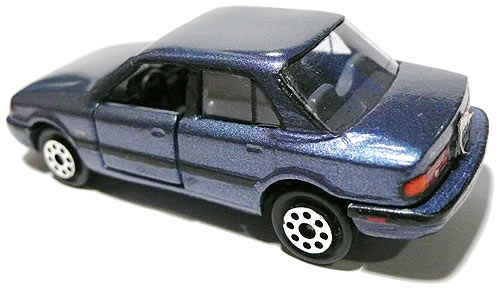
Here's the result: The body in its finshed shape.I am happy to having kept the opening doors. I formed the pillars out of thin metal from a mustard tube, which i fixed onto the body with superglue. After the main body shaping part was done, i went on to painting the body. I decided to do a replica of my real car, so this shade of blue had to match the original.
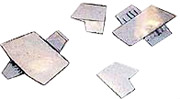
There were no windows I could use from another 1/64 car but the custom windows i am used to make out of HW blister packs.It needs a paper prototype window, which is then being applied to the blister pack to give it the final fitting shape. When this was done, i decided to add a realistic touch to the windshield by adding black wipers, which were also made of blisterpack plastic. One just has to be fairly careful when sticking the windows to the body, so the liquid superglue won´t come onto the outer part of the body or onto a part of the window visible from outside.
The bumpers on this Mazda are bigger than on the european version of the same car. This is also the most visible difference between the two versions. Therefore I first had to cut off the standard Audi 90 Grille and take the UHU repair all to add some length. When the glue dried, I formed it isung a sandpaper and a engraving dremel tool. The grille on the body and some door lines as well as the lights have been engraved too. The base was then sprayed blue and put some black lines and the red rear side marker light as detail.

I used the metallic blue spray paint which i often use to cover some of scratches on my car.
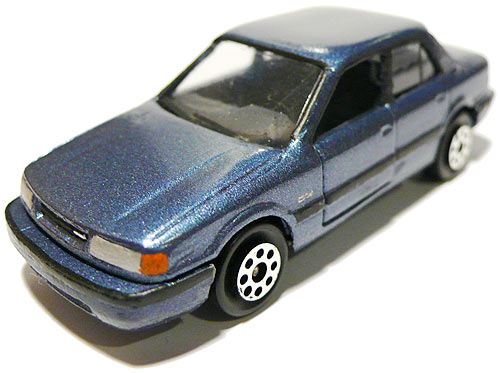
After the paint dried, I detailed the grille, window frames, headlights and rear lights.
A coat of clear enamel was put over the body and bumpers to create that polished effect and at the same time protect against minor scratches. After that i added a custom license plate.
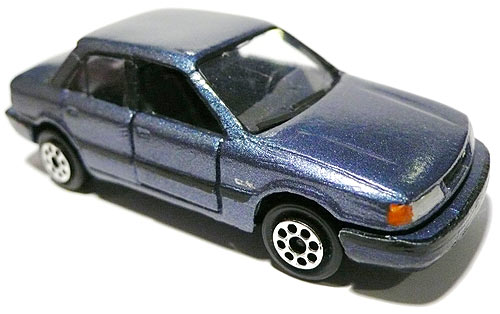
In the end, the scale of my Protege custom car turned out to be 1/58. In my opinion the final result clearly resembles the real car. For my first handmade car, that´s not too bad, i think.
Months after finishing the model, i wasn´t content with the rear pillar, which seemed too big compared with the real car. I have redone the rear part once again creating a new rear window and repainting the car once again. Here´s the final result
Thanks for the read, sorry about pictures from the stone age. I have no better work in progres pics.
I hope you enjoyed this story just as much as I enjoyed making the model.
Pictures © by Sinicars
I hope you enjoyed this story just as much as I enjoyed making the model.
Pictures © by Sinicars
Custom projects